Due to the fast-paced, high-risk elements of danger and numerous other factors involved with the construction industry, it is important that scaffolding systems be installed and used quickly, safely, and consistently. Of all proprietary scaffolding systems available, Cuplock scaffolding is probably one of the most widely used and accepted systems in the industry, and in many countries. The unique node point connection is an example of a simple locking mechanism that provides an extremely broad range of uses and provides maximum versatility and stability for a very wide range of types of projects, from simple façade work on high-rise buildings to complex industrial structures.
It is important that building and engineering companies understand how to install and set Cuplock scaffolding correctly to establish project scheduling and budget control methods for their projects. Scaffolding rental companies that promote and adhere to best practices for safely and efficiently installing Cuplock scaffolding will also enhance their customer relations and reduce their liability risk.
This guide outlines the processes involved in installing Cuplock scaffolding while maximizing the efficiency of installing the scaffolding and complying with all safety protocols.
Pre-Installation Planning: A Step Towards Fast Set-Up
Proper planning can make all the difference in regard to the speed of the setup process and avoiding potential pitfalls after installation.
Assess and Prepare the Site
Prior to construction, it is necessary to carry out a thorough site assessment. Following is a description of what to look for when doing so:
- Ground Conditions: Confirm that the ground can support the weight of the systems you will be installing. Use sole plates (or base plates) under each standard to allow for better weight distribution of that standard across the surface of the ground. If the ground is not firm or level enough, consider utilizing suitable engineering solutions such as timber mats or compaction-related solutions in order to create a solid foundation.
**NOTE: If you are unsure about what type of materials to use or if your site is adequate for a particular type of installation, consult with an experienced contractor, engineer, or technician.
- Permits and Clearances: Ensure all necessary local permits and authority approvals are secured.
- Clearance: Check for overhead power lines, underground services, and necessary public right-of-way clearances.
Component Check and Staging
The Cuplock system is known for its minimal number of primary components. Efficiency hinges on organized staging.
|
Cuplock Component
|
Function
|
Pre-Installation Check
|
|
Standards (Verticals)
|
Main load-bearing vertical element.
|
Check for straightness and undamaged fixed bottom cups.
|
|
Ledgers (Horizontals)
|
Provide horizontal support and rigidity.
|
Ensure wedge blades are intact and not bent.
|
|
Transoms
|
Provide support for the working platform (decking).
|
Verify locking mechanism functionality.
|
|
Base Jacks/Plates
|
Adjust vertical height and transfer load.
|
Check for smooth operation and threading.
|
Tip for Rental Companies: Clearly label and batch components upon delivery to streamline the client's inventory check and staging process.
Step-by-Step Cuplock Scaffolding Installation
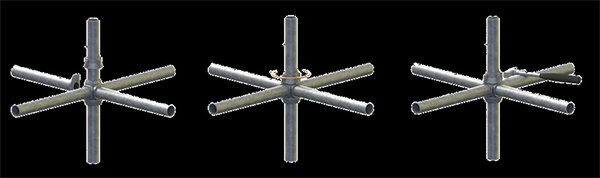
The defining characteristic of the Cuplock system is its speed, achieved through its unique locking mechanism.
Step 3: Laying the Base and Installing Base Jacks
- Layout: Measure and mark the position of the standards according to the planned bay size. A standard bay size is typically 2.5 m x 1.2 m.
- Sole Plates: Place the sole plates on the prepared ground at the marked points.
- Base Jacks: Insert the threaded base jacks into the sole plates. Adjust the height of the base jacks to ensure the structure begins level. Use a spirit level across the entire base perimeter.
Step 4: Erecting the First Standards and Ledgers
- First Standards: Place the standards over the spigots of the base jacks.
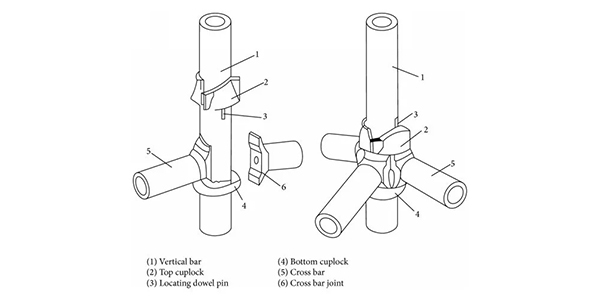
- Ledger Connection: This is the core of the Cuplock system.
Place the ends of the ledgers over the lower cups of the standards.
Insert the wedge blades (or tangs) of the ledgers into the bottom cup.
Place the top cup over the wedge blades.
Drive the top cup down with a hammer until it is tightly secured against the bottom cup. Crucially, the cup must lock the blades firmly, preventing movement. This action simultaneously secures up to four components (two ledgers, two transoms) at a single node point.
- Square and Plumb: After the first two bays are erected, use a long spirit level to check the frame for plumb (vertical alignment) and square (right angles). Correct any deviations immediately by adjusting the base jacks.
Step 5: Continuing the Vertical Build-Up
- Second Lift: Once the first lift (height) is complete and braced, place the next set of standards on top of the first, using the spigots provided.
- Repeat: Repeat the process of installing ledgers and transoms to form the next level (lift). Ensure all connections are fully locked using the top cup mechanism.
- Bracing: Install diagonal braces to enhance lateral stability. Bracing should be installed at specific intervals (e.g., every 5th bay) and at the ends of the scaffold run, following engineering specifications.
Safety and Compliance: Non-Negotiable Requirements
No amount of speed justifies compromising safety. Adherence to best practices is vital for site safety and regulatory compliance.
- Ties and Anchoring: The scaffold must be securely anchored to the supporting structure (the building) at mandated horizontal and vertical intervals. Use approved anchorages, ensuring the structural integrity of the tie-in points.
- Working Platforms: Platforms (boards/decks) must be fully boarded, without gaps, and secured against displacement. Install guardrails and toe boards on every working lift to prevent falls and stop tools/materials from dropping.
- Load Calculations: Never exceed the designed load capacity. This includes the live load (workers and materials) and the dead load (the scaffold structure itself). Engineering firms must ensure the final design meets the required safe working load (SWL).
- Trained Personnel: Only personnel who have received certified training in the erection, alteration, and dismantling of Cuplock scaffolding should carry out the installation.
Practical Tips for Maximizing Site Efficiency
For construction and engineering management, efficiency means cost control.
- Kitting and Logistics: Instead of delivering a bulk pile of components, kit the materials needed for the first few lifts in organized bundles. This reduces search time on the site.
- Tooling: Ensure installers have the correct, well-maintained tools (e.g., standard scaffold spanner, calibrated hammer for locking the cups).
- Modular Assembly: Due to the system's modular nature, pre-assembling larger frames (where practical and safe) on the ground before lifting can save time at height.
- Clear Communication: A designated Scaffolding Supervisor must clearly communicate the erection plan, lift-by-lift, minimizing misunderstandings and re-work.
Conclusion
When implemented correctly and following safety protocols, the Cuplock scaffold setup provides a well-defined way to succeed on any construction project. The ability to assemble the Cuplock scaffold quickly with high levels of support is what makes this system well-suited for projects that require great amounts of work in challenging conditions. Construction companies can successfully harness the benefits of accelerated delivery timelines, increased safety during construction, and project costs staying within budget by utilizing the Cuplock scaffold system through detailed pre-planning and managing their components in a systematic manner while adhering to the strictest safety regulations of the construction industry.
FAQ
What makes Cuplock faster to install than traditional scaffolding?
- It's unique cup-locking system. It allows four components (ledgers/transoms) to be secured simultaneously with one hammer blow, drastically reducing installation time compared to tightening individual couplers.
What is the most critical safety step during Cuplock setup?
- Ensuring the top cup is fully driven down and locked. This secures the connection points, which is vital for the scaffold's load-bearing capacity and stability. Also, always verify adequate anchoring (tying) to the structure.
Can Cuplock components be mixed with parts from other systems?
- No, never. Mixing components is a serious safety violation that compromises the designed structural integrity of the Cuplock scaffolding system. Use only certified, compatible parts.


 en
en fr
fr es
es