The Professional Guide: How to Erect an Aluminium Scaffold Tower Safely and Efficiently
Mar 26, 2026
In the modern construction, engineering, and maintenance sectors, working at height remains the leading cause of workplace fatalities and major injuries. The Aluminium Scaffold Tower has emerged as a premier solution for these challenges, offering a unique blend of high strength-to-weight ratio, rapid deployment, and corrosion resistance.
However, the convenience of mobile access towers often leads to complacency. A tower is not merely a ladder with a platform; it is a precision-engineered structure that relies on truss logic and interlocking components. Misunderstanding the physics of a tower—such as its center of gravity or wind load resistance—can lead to catastrophic structural failure.
1. Pre-Erection: Risk Assessment and Regulatory Compliance
Before any equipment leaves the warehouse, a rigorous pre-erection phase must occur. In professional environments, this involves more than a quick glance at the ground.
Understanding EN 1004 Standards
Most high-quality aluminium towers are designed to meet EN 1004. This standard dictates the materials, dimensions, and loads the tower can safely handle. As a professional, you must verify that your tower is rated for the specific "Load Class" required for your task. Typically, a Class 3 rating is required for general construction work, supporting a distributed load of 2.0 kN/m².
Site Survey and Risk Assessment (RAMS)
A formal Risk Assessment and Method Statement (RAMS) should be conducted. Key considerations include:
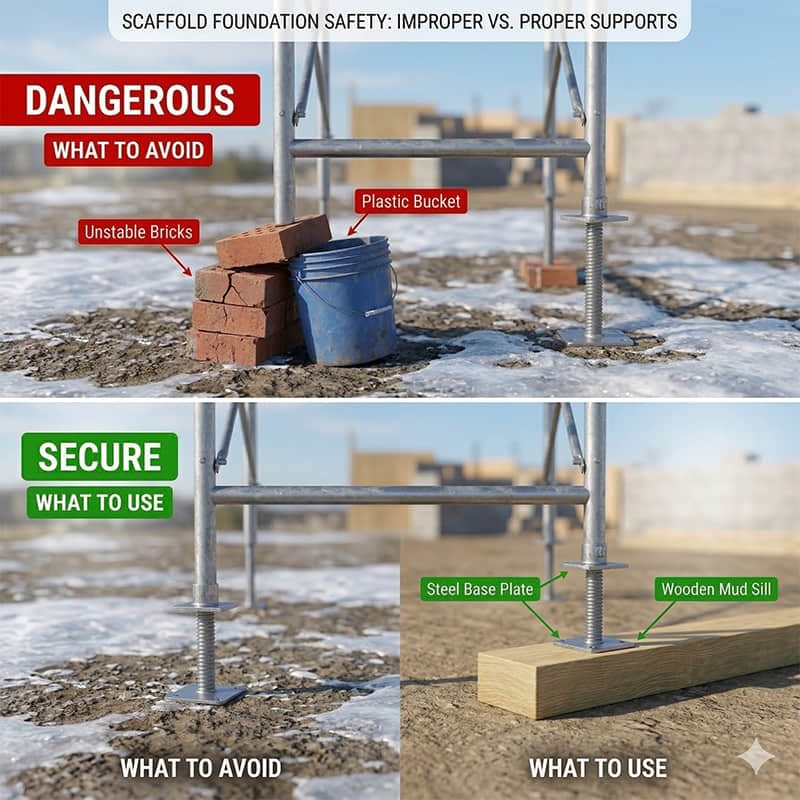
Ground Bearing Capacity: Is the surface able to hold up all the weight from the tower, employees, and their tools? Sole Boards (usually timber pads) are needed on bitumen, soft soil, or suspended slabs because of the point load failure possibility.
Environmental Factors: Check to see if there are buildings that create a high wind corridor, called the Venturi EFFECT (the increase in wind from buildings creating a corridor), leading to high winds on the Tower.
Proximity Hazards: Locate overhead cables, moving equipment such as Forklifts and Cranes, pedestrian traffic, and the need for the installation of physical hoarding or barriers.
The Component Inspection
Every component must be checked against the manufacturer’s schedule. Using a "mix and match" approach with components from different brands is a critical safety violation that can lead to structural collapse.
Castors: Verify that the tires do not have flat spots and that both the wheel and swivel are locked by the brake mechanism.
Adjustable Legs: Confirm that the threads of the adjustable legs are free of concrete slurry, grit, and debris to support smooth leveling of the unit.
Brace Hooks: The internal springs should have resistance, and the "trigger" should lock positively onto the frame without any force being manually applied.
2. The 7-Step Erection Process: A Technical Breakdown
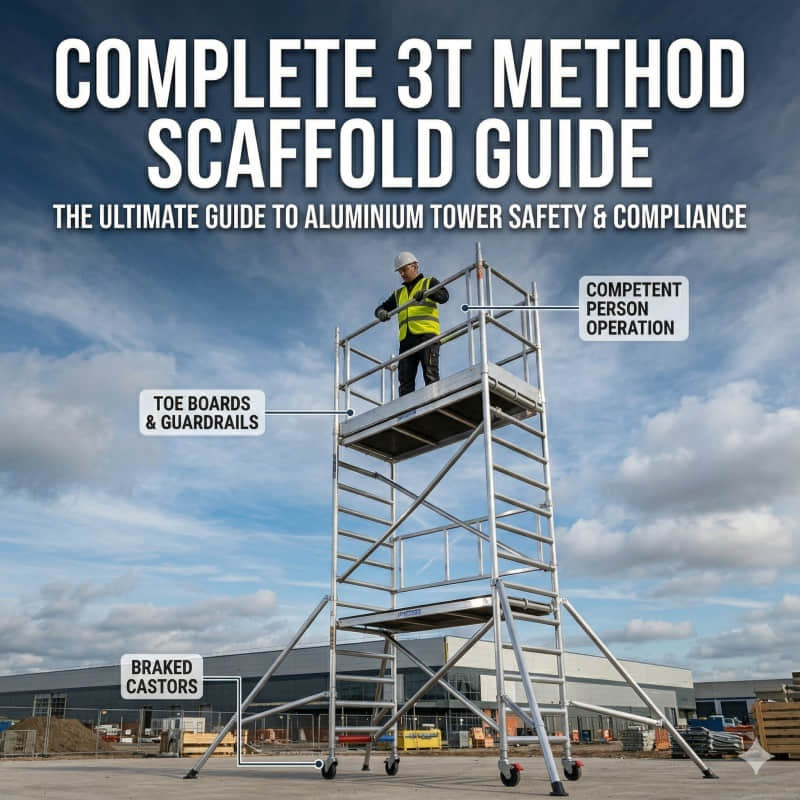
Following a standardized sequence reduces the margin for human error. We utilize the 3T Method, which is the gold standard for collective fall protection in the European Union and the United Kingdom.
Step 1: Clear The Area and Establish the Safe Zone
Clear a perimeter of at least 2 meters around the intended work area. Layout all components systematically: frames, braces, platforms, and stabilizers. This prevents "hunting for parts" while at height, which is a major cause of overreaching—a primary factor in falls from height.
Step 2: Connect The Adjustable Legs and Castors
Start with two base frames (usually ladder frames). Insert the adjustable leg and castor units.
Technical Detail: These should go in without any forcing of the frames. If they do not roll in easily, then it is likely that the frame has become "out of round" as a result of some previous damage.
Critical Action: Engage the castor brakes immediately. A tower must be built "from a locked base."
Step 3: Attach The Horizontal Braces
Connect the two frames using two horizontal braces.
Positioning: Attach the anchor points to the vertical tubes at the top. Ideally, just above the first or second rung to create a rigid foundation.
Geometric Integrity: We need to check that the diagonals are equal in length. If they are not, then the base is not square, and our tower will start to tip. This lean will increase over time and will affect the location of the weight’s center of gravity.
Step 4: Level The Base Of The Tower
Use a professional spirit level on both the frames and the horizontal braces.
Adjustment: The operator must now counterbalance the unevenness of the ground by turning the adjustment collars on the legs of the tractor. It is forbidden to support a leg with loose bricks, pieces of scrap timber, or stones.
Safety Margin: Keep the adjustment thread low in order to achieve the highest possible safety margin, due to maximum overlapping between the leg and the frame.
Step 5: Attach The Initial Platform
Install a trapdoor platform at the lowest recommended level.
The 3T Entry: The trapdoor should be positioned so that the internal ladder provides easy, unobstructed access.
Wind-Locks: Ensure the hooks are snapped over the rungs and the wind-lock clips are engaged. This prevents "uplift," where wind or moving personnel could inadvertently dislodge the platform from its seat.
Step 6: Increase The Height of the Tower (The 3T Technique)
As you add subsequent frames (usually 2-meter sections), the 3T method dictates a specific sitting position:
Access the platform through the trapdoor.
The Seated Position: While sitting in the trapdoor with your feet on the ladder rungs below, your body is protected by the frames.
Install Guardrails: Snap the horizontal braces into place to create a guardrail at approximately 0.5m (mid-rail) and 1.1m (top-rail) above the platform.
Finalize Height: Only once the guardrails are secure on all sides can you stand fully on the platform to add the next set of frames.
Step 7: Final Guardrails, Toe Boards, and Stabilizers
At the final working height, the tower must be fully enclosed.
Toe Boards: Install these around the working platform. In urban environments, this is a critical legal requirement to prevent "dropped object" hazards to pedestrians.
Stabilizers (Outriggers): These must be attached as soon as the height reaches the manufacturer's specified ratio. Ensure the stabilizer feet are firmly on the ground and the clamps are tightened to prevent rotation.
3. Stability Ratios and Wind Load Management
Understanding the physics of a mobile tower is what separates a professional from an amateur. Aluminium towers are lightweight by design, which makes them susceptible to wind force.
Height-to-Base Ratios
The "Stability Ratio" is the height of the tower divided by its minimum base dimension.
Internal Use: Typically, a 3.5:1 ratio is acceptable if there are no side-loads.
External Use: Because of wind loads, this is reduced to 3:1. If your tower is 2m wide and 1m deep, your "base dimension" for calculation is 1m, meaning your height limit is significantly lower than a square-based tower.
Wind Speed Limits and Force
At wind speeds exceeding 17 mph (approx. 27 km/h), all work on the tower must cease. At higher speeds, the tower should be dismantled or securely tied to a permanent structure using specialized wall ties. Never attach "debris netting" or large banners to a mobile tower; these create a "sail effect" that can generate enough force to tip even a fully stabilized tower in moderate gusts.
4. How to Dismantle a Tower Safely
Dismantling is not just "erection in reverse"; it requires specific care to ensure no components are dropped or damaged.
Clear the Deck: Ensure no tools, debris, or toe boards remain on the top level.
The 3T Descent: Access the top platform via the internal ladder. Open the trapdoor and sit in it.
Remove Guardrails: From the seated position, unclip the guardrail braces. Always leave the lowest braces in place until you have descended to the next level.
Component Handling: Pass components down to a colleague or use a reliable hoist rope and a "lightweight" pulley system. Never throw components to the ground. Impact on concrete causes micro-cracks in the aluminium that are invisible to the eye but can lead to catastrophic failure during the next use.
5. Maintenance and Storage: Protecting Your Assets
For equipment rental companies and large contractors, the longevity of the tower depends on professional care.
Cleaning: Remove plaster, cement, or paint splashes immediately. These materials can hide structural cracks or prevent braces from locking correctly.
Lubrication: Use a dry silicone spray on the trigger hooks. Avoid heavy oils or grease, as they attract grit and dust, which can grind down the locking mechanisms.
Storage: Store frames vertically in dedicated racks to prevent bending. Ensure they are protected from corrosive chemicals, particularly acids used for brick cleaning or industrial solvents.
6. Common Mistakes to Avoid (The "Never" List)
Never use a tower as a support for a ladder or another scaffold.
Never move a tower when people or materials are on it.
Never climb the outside of the tower.
Never use a tower that is missing its "Scafftag" or inspection record.
Never lean over the guardrails to perform work; move the tower instead.
Never stand on the guardrails to gain extra height.
Conclusion
Mastering the erection of an aluminium scaffold tower is a core competency for any modern construction or engineering firm. By adhering to the 7-step process and the 3T method, you are doing more than just following rules—you are protecting lives, reducing project risk, and increasing team efficiency.
In an industry where reputation is built on safety and reliability, using high-quality, EN 1004-compliant equipment is the first step. The second is ensuring your team is trained, competent, and diligent in their assembly practices. A safe site is a productive site, and a well-erected tower is the cornerstone of that safety.
FAQ
Do I need a license to erect an aluminium scaffold tower?
In many jurisdictions (such as the UK under PASMA regulations or the US under OSHA), you do not need a "license" like a driver's license, but you must be a "competent person." This means having the necessary training, knowledge, and experience to assemble, use, and dismantle the tower safely. Professional sites usually require proof of a recognized training certificate.
Can I use an aluminium tower on sloped ground?
Yes, but only if the tower is equipped with adjustable legs. You must use these legs to level the tower perfectly according to a spirit level. Never use bricks, wooden blocks, or loose materials to "build up" a leg on a slope, as these can shift under load and cause the tower to tip.


 en
en fr
fr es
es